

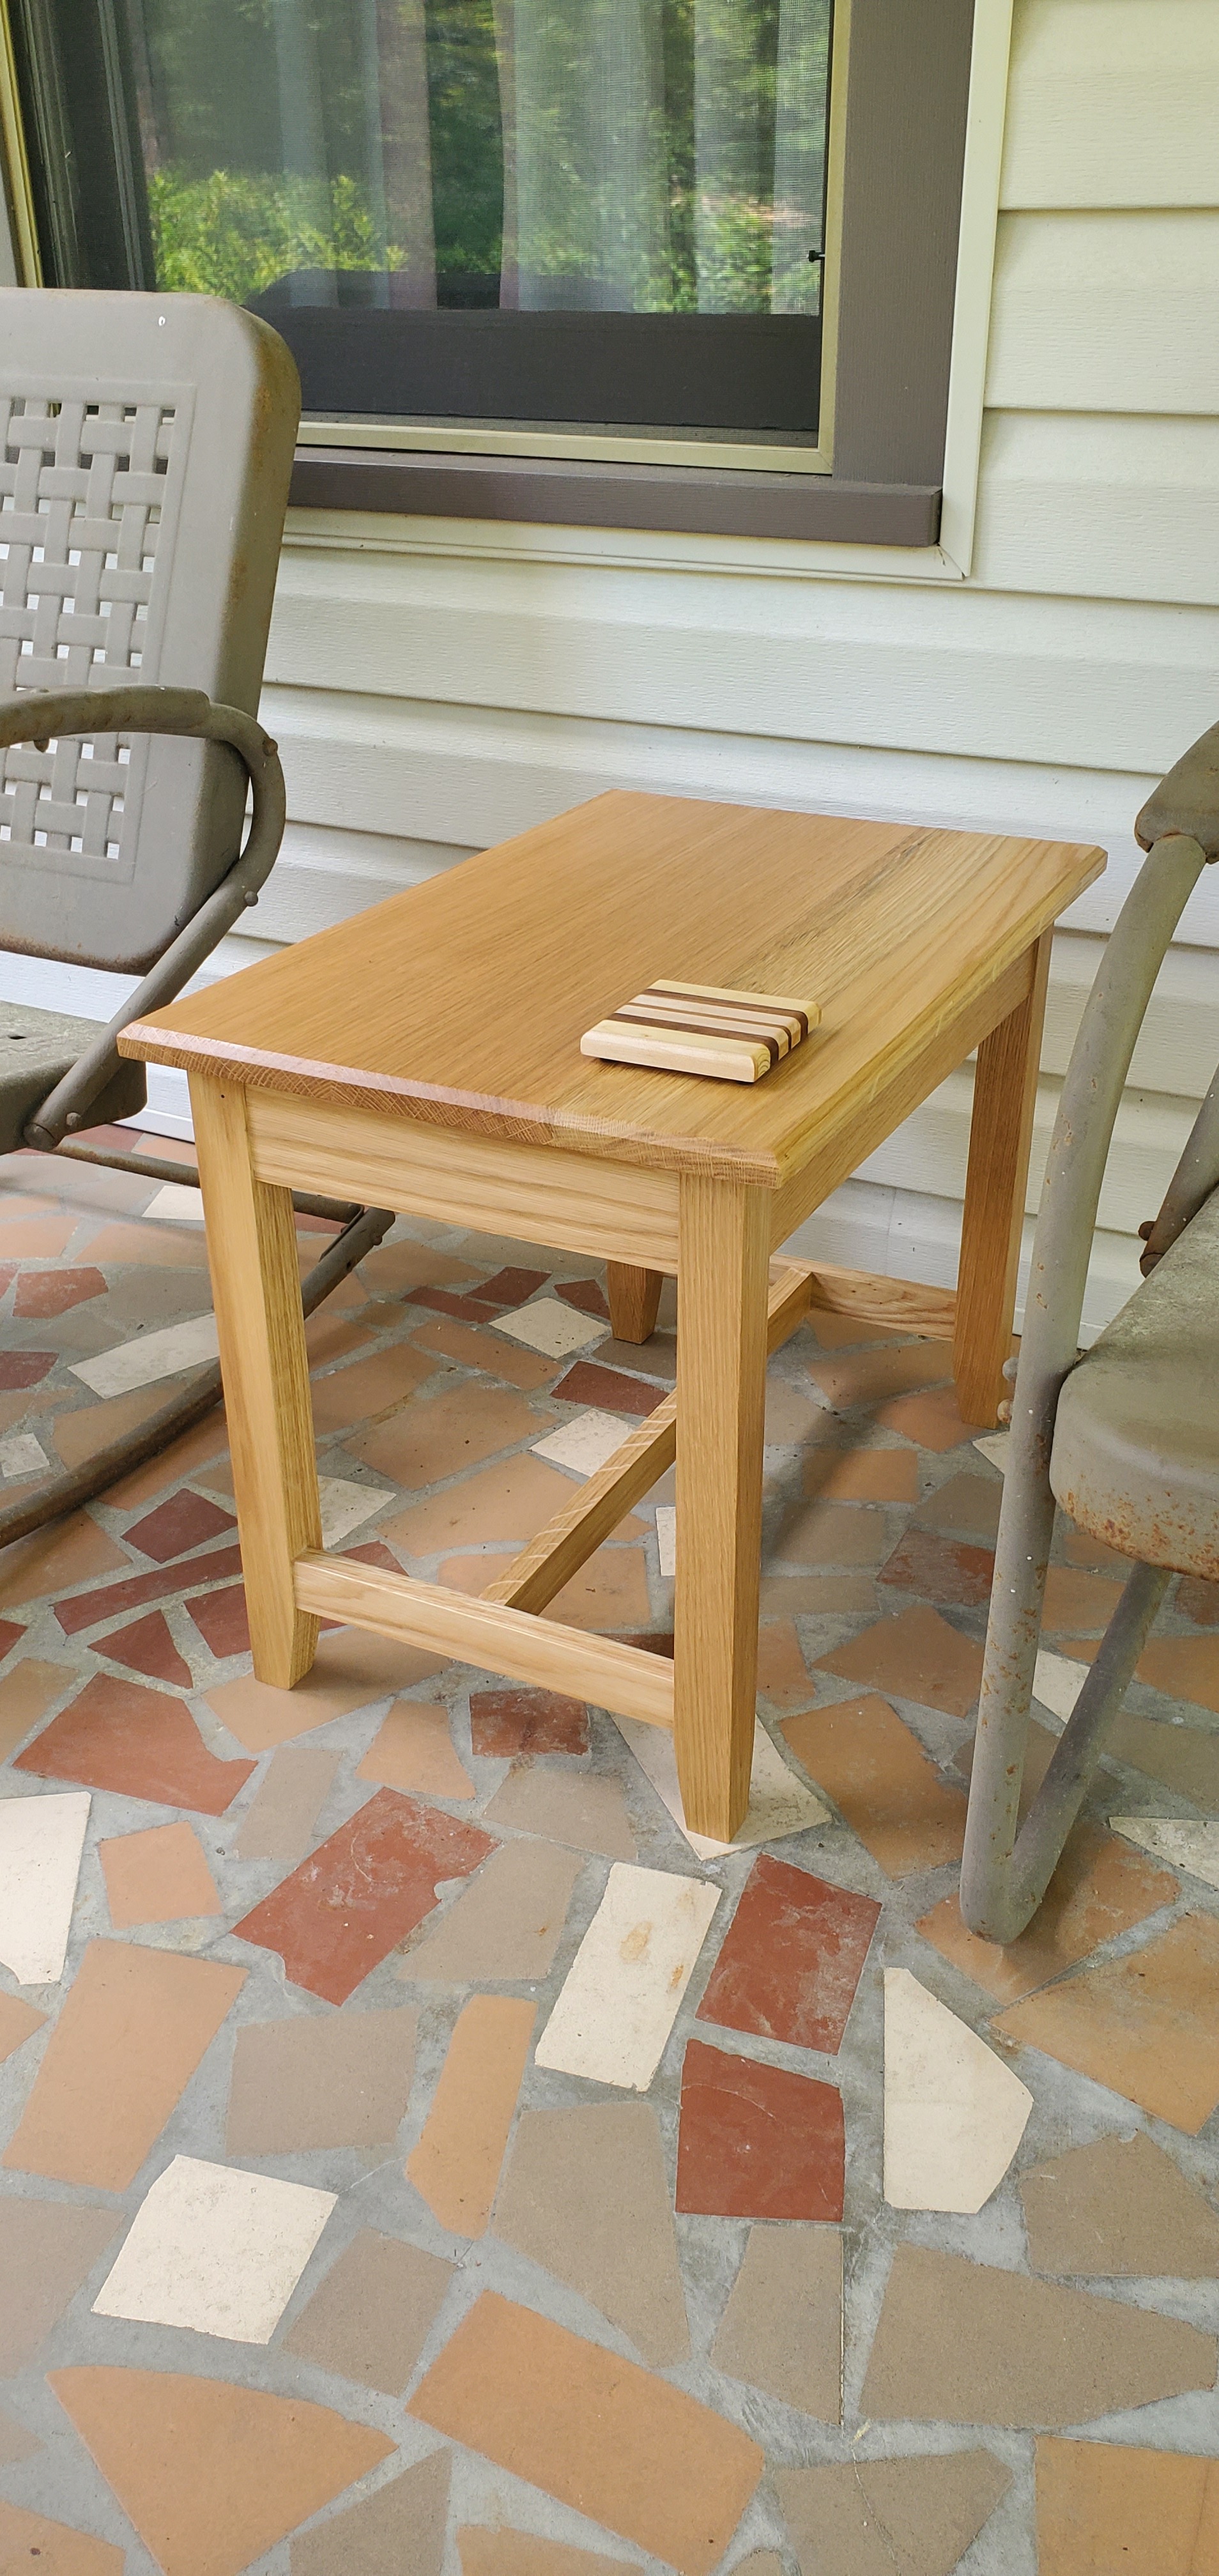
I posted this one to [email protected] too, as I do most of my furniture projects, but I’m particularly proud of how this one came out. Solid white oak with genuine mortise-and-tenon joinery.
You must log in or register to comment.
Nice-looking table. A lot more symmetrical than any table of mine would be.
That looks flawless. Good work 👍
Thanks!
love it, could you add some drink holders to it?
See that little rectangle sitting on the near corner? That’s a coaster made of pine, walnut and maple.
yep thats what made me think of it
Good job!
Nice! Love the use of oak. Should last for generations.
We’ll see how well my joinery holds up. This is actually the first project I’ve successfully built with f’real tenons.
Oak is rapidly becoming a favorite material of mine.
Why is it becoming your favorite?
Well first of all it’s quite attractive when finished, I really like the figure of the grain and the medullary rays are particularly attractive in white oak.
It’s a multifunctional wood, it’s well rot and bug resistant so when finished correctly it holds up well outdoors, it’s hard and durable enough to use as tabletops or other surfaces that get a lot of wear, and especially when quarter sawn it’s quite stable.
It’s not as blade meltingly hard as maple or hickory and not as gooey and resinous as pine. I quite like how it smells as you cut it, reminds me a lot of bourbon (in fact white oak is why bourbon smells the way it does). The grain is large but straight and even, there aren’t many surprises halfway through a cut where you suddenly hit something dense. It is definitely a hard wood but it’s not too tough on tools.
It finishes beautifully; Freshly sanded it’s pale tan with a slight pink cast to it but it takes on a very nice gold when oiled or varnished and the medullary rays form fascinating patterns.
It sounds like a real joy to work with. All of the cabinets in our house are oak.
Mine are birch plywood or worse. The shelves in my bathroom linen closet I shit ye not are half inch OSB. Maybe someday I’ll redo those.
Sounds like you have a great future project!
Very beautiful! I wish oak was more available where I’m at.
Oak is the second most abundant wood in my area after yellow pine. My uncle’s got an oak log that fell in a storm I need to haul down to the sawmill.
Oooo looks really good!
It’s a beautiful table but I’m not sure it’s big enough to hold your porch.
Wait checks blueprints shit you’re right I read this in inches and it’s laid out in feet. I’ll find something to use it for though.
That’s awesome! How did you make the joints? Do you do it manually, or use a machine? It seems like it would be very difficult to get it right just using regular saws and routers.
I did most of the joinery on a router table with some help from the table saw and a bit of hand finessing with chisels.
All but two of the mortises are routed. A 3/8" up-cut spiral “end mill” bit in the router, set the fence the shoulder thickness plus the reveal away, mark the extent of the bit on some tape on the table, mark where you want the mortise to stop and start on the work, plunge in, run a groove, then either stop the router and wait for it to stop or plunge out. These were 3/4" deep so I did them in two passes. This leaves a slot with rounded ends which I squared with a chisel by hand.
You see the I-shaped brace? The two mortises in the middle of the short braces I did a more traditional way, drilling out some of the stock with my drill press and then chopped the rest out with a chisel.
All of the tenons were made with the router table and the table saw. I’ve tried and failed before to form tenons with my dado set in the table saw, ie “cut two rabbets” because I can’t seem to get the precision I need from the table saw’s depth setting. So what I did was mill the stock with my thickness planer very carefully to precisely 3/4" thick and crosscut them using a stop on my table saw’s miter gauge so opposite pairs were exactly identical, used the fence and the miter gauge together to make precise shoulder cuts (this is not a through cut, no off-cut was left trapped between the blade and the fence so this is safe, but if it sketches you out you can use a stop block or a sled) then I set up the router table basically for rabbeting with a straight bit, if that makes sense. The two wings of the fence opened with the bit set almost but not quite 3/4" high and protruding 3/16" out of the fence. I then ran the stock vertically against the fence to make the cheek cuts. Two 3/16" cuts took a total of 3/8" out of the thickness leaving a 3/8" tenon that fit snugly into the mortises. To make the side cuts I did a couple of them with a dovetail saw, got bored and then used the sled on my table saw to put them through the blade vertically. A little bit of cleanup with chisels, a hand scraper and some sandpaper and the dry test fit was surprisingly sturdy.
The top panel is held on with metal Z clips that slip into a groove in the aprons cut with a table saw and then they screw into the top, otherwise it’s just a flat panel.
That sounds like it takes some real craftsmanship and a lot of patience. I think I would really enjoy woodworking if I had the space for a shop. I do have a garage, but it’s currently serving duty as a storage shed. I have table saw in there, but no space to use it.
That sounds like it takes some real craftsmanship and a lot of patience.
That actually means a lot to me. I’ll admit that impatience is a significant personal flaw of mine. I’m quick to jump down my own throat at a setback. Someone looking at my work and saying “wow that must have taken a lot of patience” wasn’t something I was ready to hear.
As for having space for a shop, behold:
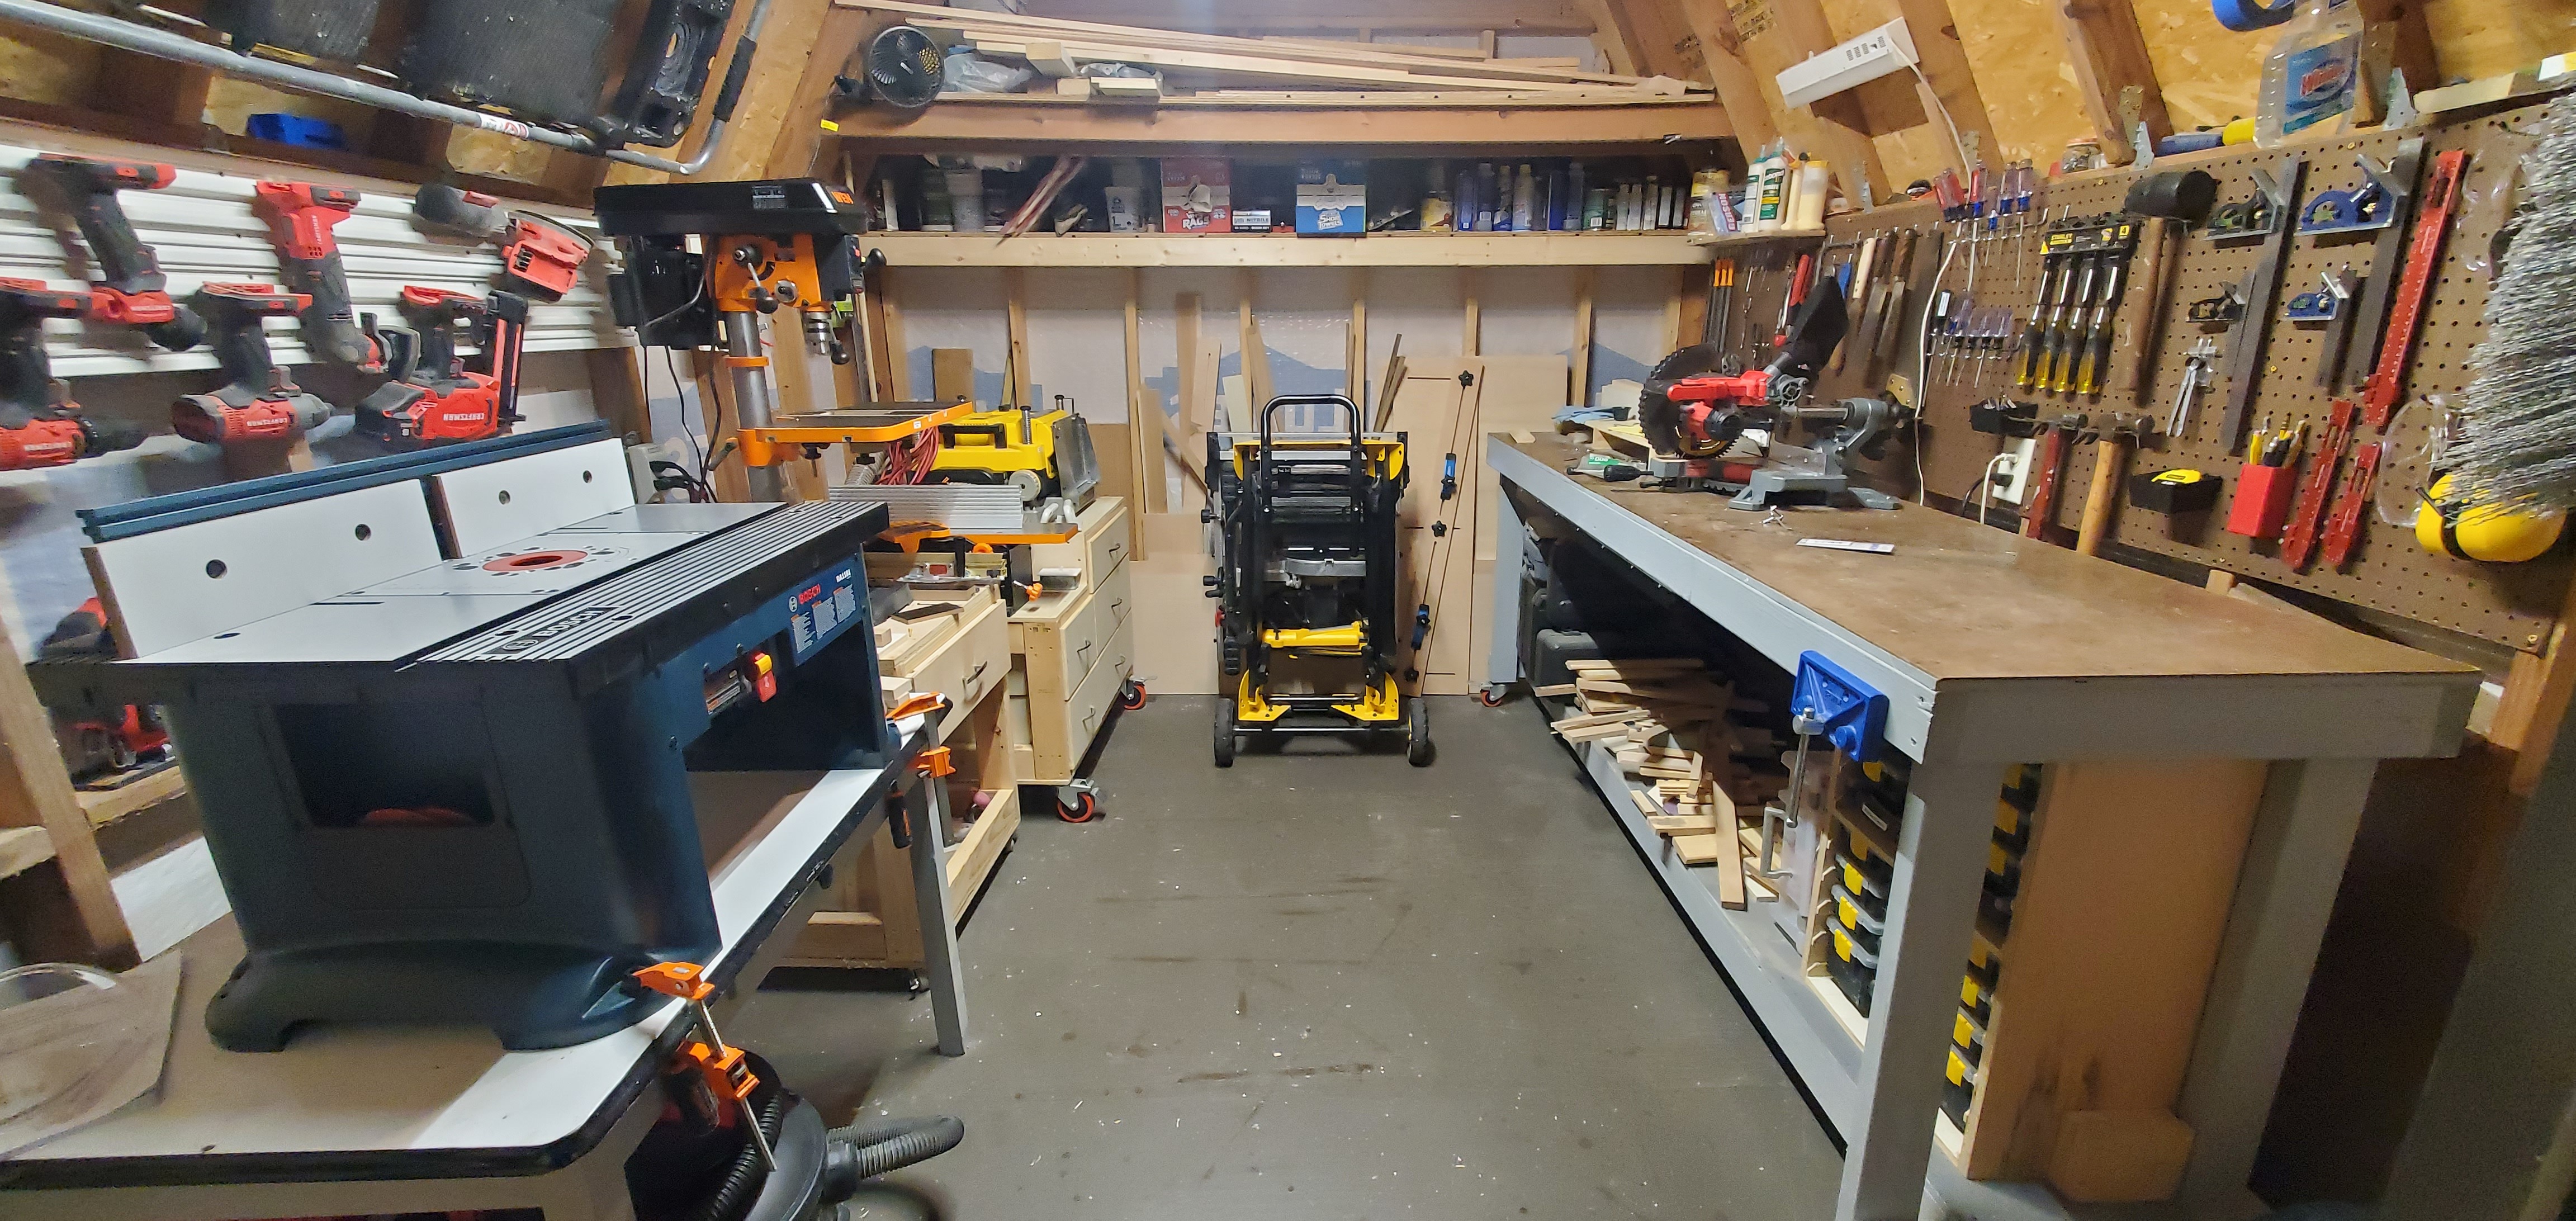
The 10x12 foot garden shed into which I have crammed a nearly complete furniture shop. The table saw and the planer/jointer cart have to go outside to really use them, and I’ve got absolutely nowhere to put a band saw or a lathe. It would be quite a luxury to have a table saw I don’t have to unfold before working. And my little shop is positively cavernous compared to some I’ve seen. Carve out a little space and pick something out to make.
That is glorious! We’re actually in the planning stages right now to build a 12x10’ gardening shed to get all this shit out of our garage, and then I’ll have a spot to park, and I can move the truck out to have a spot to work. We’re going to the hardware store tonight to get some tools, and I’m waiting for the plans my wife ordered to be delivered tomorrow. Then we’ll buy the lumber, clear the space, and I’m going to build the shed.
That sounds excellent! Be sure to post it here when complete.
Will do! I’ve never built a shed on my own before, but I framed houses for a living for about six months in my late teens, and worked as an industrial carpenter before that. I think I’ll be able to do it without issue, but my experience is from like 25 years ago, so we’ll see. The parts that have me most worried are the floor and the roof, especially the roof.
The above shed was built by my father when I was a zygote. I was born just before it was complete. He made himself a little wood shop and built a few pieces of furniture into the early 90’s, then life kinda happened and nature kind of took it. You may notice in the picture some of the 2x4s look a lot newer than others. We heavily remodeled it a couple years ago into what you see today, took it down to the studs, cleaned it up, Tyvek, siding, roof sheathing, and shingles. It was that year’s major project.
That’s super nice! Def making me want to take the plunge.
Thinking of getting into woodworking?
Yep! Just posted in the woodworking community asking about how to get started.
Tell ya what I’ll catch you over there.
Can you share a link to that community? I want to join too.
[email protected] Welcome to the community!
Thanks!
very nice
Nice work
That’s really nice work, you should be proud of it!
How did you finish the wood? That soft sheen looks good.
That’s Minwax’s Helmsman semi-gloss spar urethane, thinned 60/40 with paint thinner and wiped on with rags cut from an old T-shirt, 4 coats, 8 hours in between, buffing each coat with a little chunk of paper grocery bag in lieu of high grit sandpaper. Learned how from this guy: https://www.youtube.com/@paulsDIYsolutions

