Hey folks,
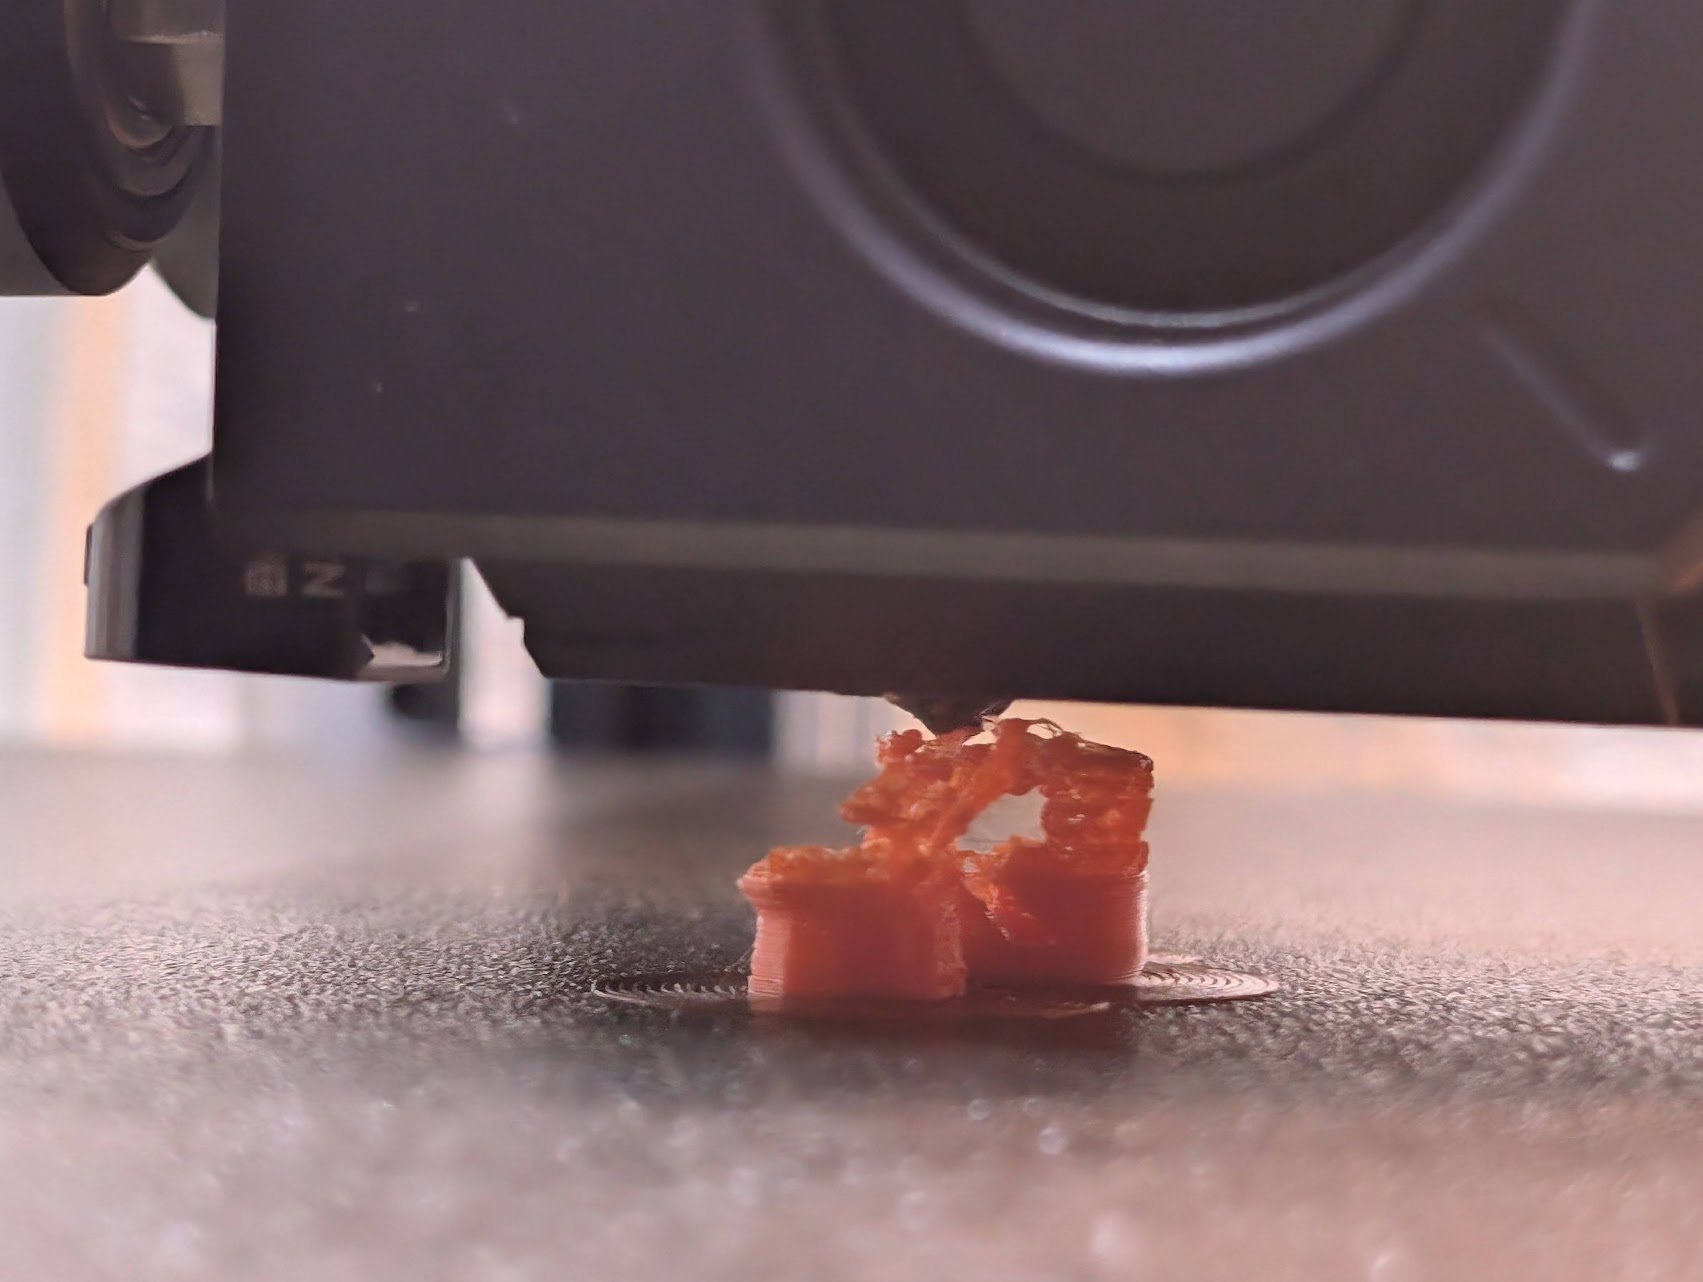
I’m not sure what I’m doing wrong. I’m printing PETG (https://kingroon.com/collections/petg-filament?) on my Neptune 3 Plus. It’s sort of like it starts (almost) ok, sticks to the plate just fine, then a few layers up it seems to almost have inconsistent extrusion (or maybe even trouble pulling the filament?) leading to holes, etc. till the model just falls apart. See linked photos for about where I give up each time.
I’m printing with Cura and 240C printing, 90C on the build plate. 45mm/s (I’ve gone down from 60mm/s). Retraction on, no z-hop. 60% fan, though I’ve tried it with 20% and 100% fan as well.
The filament is in a dryer at 55C. Funny enough I printed basically perfectly (without drying, straight out of the bag) with default settings the first time I printed. The second time and on, have had this problem… and have had it in the dryer.
Any ideas would be much appreciated. Thanks!
Edit: In case its useful, I’m printing this piece: https://file.io/D9jxYq4KOrL7 which is a small remix of a piece from https://www.printables.com/model/130507-bolt-action-pen-for-pilot-g2-cartridges
You need to watch it carefully. PETG has a lot of trouble with moisture. In practice, it has a lot of trouble with seams. When I print PETG, it is not a passive choice, but is instead built into the design. To be fair I pretty much design everything I ever print. I might prototype in PLA and then print in ABS, ASA, or Polycarbonate, but I will not swap to PETG. With PETG I am designing the orientation and features around seam placement from the very beginning to hide them in the middle of the back faces of a parts where they have 4-10mm to start and establish consistency. If I need a better seam in a tighter area, I make a small curved v-groove like the center inner spine of an open book. This feature can be extremely small so long as the mesh resolution can render it and the slicer also picks it up. The groove and curve will place the seam start and end on the inside of the wall just enough to make the ugliness isolated to a smaller area.
This may at first seem unrelated, but I suspect you might find a similar type of issue where starting seams are not attaching properly and causing a cascade of issues.
The actual underlying mechanism to the seam issue is that PETG is extremely sticky when molten. Moisture will sound like little popping sounds in the extruder and these can push out a tiny bit extra of filament. Even with dried filament, PETG will want to create strings on almost every passing surface that so much as looks at the nozzle the wrong way. When PETG goes stringy, it tends to pull more strongly on the melt zone than any other common filament. This tends to pull out more than the typical wisp of a string and instead pulls a slightly larger bit of the melt zone just outside of the tip. This deviation makes seams difficult to ground consistently.
If you try to just go hotter, you’ll ooze more and the problem will be worse. If you try to z-hop higher, you’ll likely find that the string from the last extrude is just as problematic. You might add more retraction, but you’ll still have the previous issue of the last extruded wisp pulling on the melt zone. If you print in vase mode, the problem will disappear, but that is useless advice. PETG can be extremely consistent in performing badly at the seams. This makes it pretty good for print far production in cases like with Prusa. They can dial in every issue on a layer by layer level and achieve prefect and repeatable parts in PETG. I don’t want to print 500 iterations of my design to dial in perfection, so I only use PETG when I can completely hide the seams in the design and create enough margin to avoid any external ugliness. PETG is awesome because it is the only common filament that will conform to the print plate texture with no visible layer lines. This feature is my primary reason for using PETG.
It is just a hunch, but I bet this is a seam issue.
This is an interesting thought. I wonder if the support tree is leading to more seams leading to issues. I’ll try it tomorrow with a different support structure that would change the seams.
Did you notice a difference in print speed when you slowed down? As this is a small print, it could already be as slow as it will be due to minimum layer times.
It could also be that the nozzle spends too much close to the print. What happens if you print 2 or 3 of them?
This is typically more of an issue with PC where you don’t have a part cooling fan running, but maybe it’s the case here too?
Honestly not very different timing: maybe 25 minutes instead of 20 to be failing.
Trying more than 1 is an interesting idea. Too bad I don’t need more than 1 lol. Maybe I’ll print a benchy elsewhere on the plate. Though why wouldn’t more cooling help offset similarly?
It could be a case of too much cooling, while simultaneously being too much heat.
If you’re blowing so much air that the filament instantly solidifies when it leaves the nozzle, it’s not going to bond with anything else. It’s also interesting that the first layers are fine (when the part cooling fan is typically not running), but problems start when the part cooling fan turns on.
Have you tried without part cooling at all? Another thing is that your part cooling might be cooling down the tip of the nozzle, causing tiny partial clogs, which are cleared every so often by friction.
Weird as heck but without any cooling it printed fully just fine. Thanks for the advice!
FWIW the default PETG profile on my printer doesn’t even run the part cooling fan at all except during bridges. PETG has a very narrow window of suitable temperatures typically between 240 and 260° C, and if you’re printing with your nozzle at 240 you’re already scraping the lower end of that range. And unlike PLA, especially the modern blends we have now that are full of additives to make the stuff easier to print, there is no leeway. PETG will essentially solidify instantly once it falls below that critical temperature point. Not only underextruding severely (or not extruding at all) but likely also failing to bond to the layer underneath with whatever does manage to make it out of the nozzle.
On my machine you can hear it when this happens, a least. The extruder gears click like mad whenever there’s a failure to extrude at any significant volume.
Ive had PETG sitting in my 40% humidity basement with no issues, I think thats a partial clog from retraction. If you have a direct drive try 1-2mm of retract, 3-4 for bowden. This will ooze more, but that’s the tradeoff
It may be worth going a little hotter. I do 245° (250° if a steel nozzle) and 5° hotter for the first layer. Part cooling no more than 20% except for bridging. I dry it it 60° with plenty of hot air flow.
Have you dried it?
Yep it was in the dryer at 55C after the first print for several hours.
My dryer has a PETG profile that uses 69C, I usually dry it for 10-12 hours just to be sure.
This looks like heat creep and/or clog. Check the hotend fan (not the part cooling one). If it starts happening after a while, it’s either that or the nozzle has cooled too much. But if it happens with lower speed as well, then I wouldn’t say it’s that it’s the latter. Try increasing the temperature. I’m printing mine at 270°C. Also I keep the bed at 70°C but that’s not important. I’ve had issues like that with bad conducting nozzles (hardened/stainless steel) and thermistors not properly seated on the heat block. When this happens, pause the print, try feeding the filament by hand and see if there is any resistance (can you feel the clog). Try increasing the temperature, reduce the retraction distance to try and avoid it. I’m printing exclusively with petg for years now, never had issues like this due to moisture. You get more stringing, yes, but no failures on actual printing.
Have you cratered your tip recently? I was having lots of problems similar to yours that were solved when I put in a new tip


