
Recently moved to a new place and haven’t found a good spot for a permanent setup yet.
I don’t sew, but I love this solution.
I’ve never thought about this and now I’m about to seriously consider sewing as a regular activity.
It’s a really nice hobby.
It’s mostly not that demanding, and super easy to learn. You see what you make with your own hands as a result (which is nice) and in the long run can replace most of your wardrobe with stuff that is exactly your style.
I make all of my underwear myself (boxers are a super simple pattern, 2h a piece), have self-made joggers, work outfits with trousers and shirts, high vis cycling jacket with merino lining in a softshell windbreaker, pullovers, backpacks…
And you can listen to podcasts and audiobooks while you’re at it, and it’s a hobby that needs little usage of screens (working in front of a display all day I want to spend time doing sth offline)
I actually know a good deal about sewing, my mother was a pretty well known dress maker in the Midwest renfair scene so I was raised to know all the tricks. I’m even restoring a singer rocketeer to be my main machine. I just don’t have a lot of room and can’t really find patterns for stuff I’d wear. The projector idea fixes one of those problems though!
Can clothes be reverse-engineered for patterns? Unstitched and traced? Is that a common practice or are there other methods
Made trousers that way and will make a copy of my SIL’s favorite onesie the same way this spring (it’s seen too much love, so time for a new one)
Ah, now that first comment makes a lot more sense.
As for your second problem, did you ever hear of freesewing.org? It’s an open source parametrized pattern generator. (can be very frustrating though if you spend 2 days on a buttoned shirt to find that you took a wrong measurement and your shoulders are too tight now) but with your background this could be the way to go. Goes very well with the projector too.
Never heard of this and now it’s my new interest for the week!
What’s really nice from my POV is that they have the github repo there for self hosting, but also got a public instance run by the initiator for all those who - like me - are too stupid to set up their own infrastructure and rather want to spend time on their sewing machine than in front of a display
Wow, never heard of anything like this! How do you calibrate the size? Pros/cons of this system?
I use pattern projector, https://www.patternprojector.com/en It’s a web-app where you first calibrate the projector to a size of your choice (I use my cutting map’s grid for that) and then load your pattern as pdf. Really simple to use, setup takes 2 minutes and you’re ready to cut
Best tip always in the comments
As to pros/cons: Con:
- you need equipment, I. E. You have more stuff standing around.
- you need to find a place to setup the projector permanently or go through the hazzle of doing it every time manually
Pro:
- TL/DR; Boost in productivity
- you safe so much time
- in the long run you save money (don’t need to print anymore, need a lot less chalk)
- you need no printer anymore
- you can perfectly align all your pieces beforehand in inkscape, then minimize the leftovers
- less time spent with stuff you don’t like to do (cut the pattern, bring pattern on the fabric) and a lot more time spent with stuff you want to do (actual sewing)
By now I just take photos of all the scrap pieces I have, with a metering tool lying around it (similar to old csi crime scene photos). That way I can judge quickly whether any leftovers I have are large enough to fit the pattern, which saves even more time :)
Bruh…genius.
Sometimes it’s amazing how one takes things for granted that blow other people’s mind.
I’ve been projecting patternssince years by now 😅
You have just blown my mind. What an amazing solution!
This is ingenuous!
My kids want to learn how to sew clothing after only ever sewing on patches. Any recommendation on how to start?
Sure!
I started with a German pattern designer, who posts in depth video tutorials to all her designs, called pattydoo.
Even if you don’t speak German, she speaks very clearly so I guess YouTube auto subtitles could do a decent job.
While I’d personally recommend starting on sth easy like a beanie. I think it’s more important that you show them why sewing is awesome. And that is because you can use your imagination to do what you want and make it reality. Make a piece of clothing you like in the style/colors/pattern you want. So if they want to go for a t-shirt or dress instead, let them 🙂 (perhaps steer clear from sth really complex like a buttoned shirt for the first thing they make…)
Then take it from there. Let them plan the project themselves (what do I want to do, which cloth do I want, how much do I need, how many buttons etc).
Especially in the beginning be generous with how much cloth you buy, that way they can make mistakes without having to stop for a week, waiting for the next trip to the store to buy an extra half-meter of fabric. And you’ll find some use for smaller leftovers eventually.
I love this, thank you for the suggestions!
You’re welcome :)
This is something I’m recently struggling since I discovered the availability of patterns online.
I’ve been learning to draw bespoke patterns from scratch and the lack of reference points for measurements on most of the available stuff throws me off.
I have considered something like this but I don’t know, seems too much set up in my tiny workshop for something I’m not sure I’ll use often enough.
PD: I love the McGyvering involved in the photo
The MacGyver variant took some time to setup, but if you can find a way to permanently mount it as I had in my old flat then it’s actually very quick to start :)
Still I get the reluctance. I was at the point where I thought of getting a printer and then decided for the projector instead. It’s faster and produces less waste (speaking more of the fabric than the paper here).
If you got a dedicated workshop (little bit of envy here, I’d love that) then you could just mount it to the ceiling, thereby it takes up no additional space
Cargo poles are cheap and often span floor to ceiling, offering a mount for any elevation. Just clamps in place. Brilliant by the way!
You mean sth like this?

Didn’t know that even existed but your suggestion is genius! That’s fixing the problem so much better than anything I came up with 😍. Ordered, incl. a mount for the Beamer. Will post an update once it’s here
For context, I’m a kite maker. I used to use projection more. I got some old school projector second hand and used that for a while.
Here’s a build video I did with that approach: https://youtu.be/IFeKcfedoGs
I’ve since moved to printed blueprints and a backlit glass table. Here’s a different build video I made using that: https://youtu.be/PQYh0GU2pvE
That’s pretty awesome, your light table means you don’t have the hand shadow on the projection, but also only works on cloth that let’s through light. what material do you use for the top so that your can cut on it and have the light shine through?
I’m mostly dealing with light ripstop fabrics. So yea, it doesn’t apply great to more solid fabrics.
The table’s surface is tempered glass. Then I have a paper template on that. Then I hot cut the ripstop right on top of the paper template with a soldering iron. If I go quick enough, the paper doesn’t burn. The paper does degrade over multiple uses, but I’ve been able to use the same blueprint ~8 times before holes start showing up.
Smart, with the hot iron you immediately seal the cut and it can’t have threads falling out any more. I’ll keep that in mind if I ever do another batch of bivy bags
I just started trying this around December. I was able to mount the projector on the ceiling, but since installation, I think it has shifted a little because one side seems slightly blurrier than the other. So I need to adjust it, but since it’s on the ceiling, it’s pretty high up and I haven’t gotten the ladder out. I’ve been mostly sewing knits and they’re forgiving enough to let it go.
If you do this for years, why do you not have a screw in the wall or anything really to get rid of the cobbled together stuff? I know nothing lasts longer than a temporary fix…
Recently moved to a new place. Here’s a Pic of the old mounting. Getting rid of the cobbled together setup was my motivation for this post. I hoped to get replies from some genius who found an inconspicuous mounting option for the living room :)
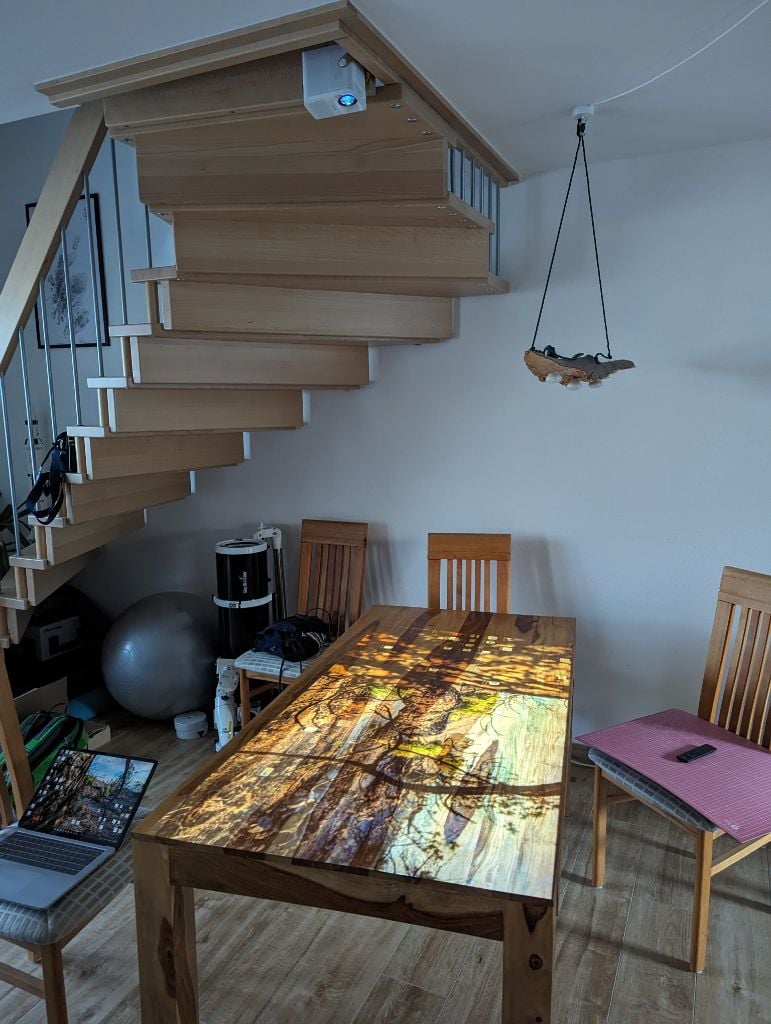
If you need an idea: Cut the wood slightly longer than the projector. Screw that to the wall.
I’m tending to a slide and lock solution currently. Would mean some 3d printing most likely but would allow to unmount the projector when not in use (the room I use is our living room, wild cables running up the wall and a projector permanently sticking from the ceiling don’t look very good)
@Nooodel I tape my tracing paper to the wall and have my projector on a tripod, easy peasy.
How do you then get it from the paper on the fabric?
@Nooodel I then use it like an old fashioned paper pattern. Lay it on top of your fabric and cut your fabric out


